Adding a New Graphic Image
Follow the steps below to add a graphic image (Comix Cover Scan) into the Wiki.
The only way to add an image to the Wiki library is to edit a page. Don't worry, you don't have to really do any editing, you just need to be in an edit screen. Please be real sure you don't do any accidental changes to any of the pages. The best bet is to select a link where the topic doesn't yet exist. These links are in red, and have a dashed underline.

Click on the “Create this page” button, as shown above. You will then go into the editing screen.

In the editing screen, you'll see a toolbar. You'll want to click on the “Add Images and other files” icon, circled above. This will open up a new window where you can add the new image.

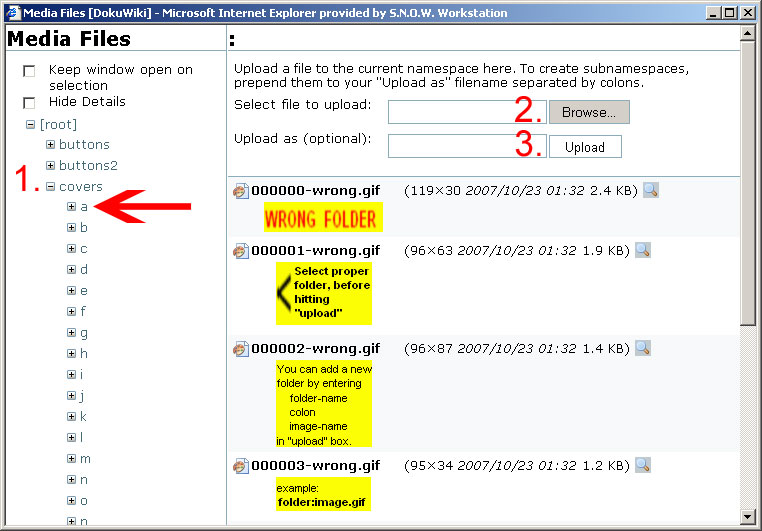
From this point, it is a three-step process to upload your image…
1. Select the proper folder for the image to go into. Most likely, you'll want to place your image in the “Covers” folder, then in it's appropriate alpha folder, as shown above.
2. Click on the Browse button to select the image file that you have stored in your computer.
3a. Okay, so it was a four-step process. Sue me. Anyway, in the “Upload as (optional)” field, you can actually change the name of the file as it is being uploaded.
3b. Finally, click on the Upload button to finish the process. Your image will appear in the images window when it finishes uploading.
At this point you can close the window, and cancel out of the page editing screen. But if you want to add your image to the page at this time, double click on your image.
Note: there is no “unload” or “move” option. So if you upload a Zap cover to the thumbs/a/ folder, it's stuck there till the end of time, or CJ crashes the server and looses everything. (whichever comes first)
If the folders provided don't suite you, type the path to your new folder in the “Upload as (optional)” field.
It will create the folder you ask for as it uploads your image. Use colons ( : ) as separators.
Example:
porn:new folder:new subfolder:etc:your-image.gif
